Friday, January 30, 2009

It's Our Wedding Anniversary"

Today is our 26th wedding anniversary and the first day of my 50/50 adventure. Starting today I will paint 50 paintings in 50 days. I am hoping that by tonight I will have my 1st one done, but our anniversary comes first. Have a great day! I am hoping to post tonight. Ooups, it is our 27th anniversary.

Thursday, January 29, 2009

Hay 46, Coastal Farm


Carol, thank-you for your feedback. I decided to change the side of the barn today. Now I really see the tractor. What do you think?

This one is also an oil painting. I could stand a critique on this one if anyone is willing. Should the left wall of the red barn be darker? Is it pulling the eye away from the tractor? There are things I like but.... something is wrong. I want the little tractor to be the focal point. This is approximately 6" X 6". HELP!!!

Wednesday, January 28, 2009

Hay 40, View from Kathy's Backyard


For some reason I just love this one. It is out on Peltier Road almost to Lyn Road. I used a reddish magenta underpainting and like how that peaks out here and there. It is approximately a 6" X 6" oil painting on a masonite board and is painted around the edges. Yesterday I finished priming and toning 100 6" X 6" boards. I will be ready to start my 50 small paintings by Friday. I have been doing photo shoots to get all the images I need ahead of time. In the perfect world I would paint these on location. In my world that is a joke for about 7 more years. To buy this painting for 150.00 click here.

Tuesday, January 27, 2009

Hay 24 Foggy Morning Tractor

This red tractor is very soft edged. I was trying to keep with the idea of the fog and foggy edges. It is very painterly. Approximately 6" X 6" on a masonite panel in oils. It is painted around the edges. It is $150.00 to buy click here.

Monday, January 26, 2009

Hay 22, Palms and Hay in the Fog

This time I was using more monochromatic color which is different for me. These palms are off Peltier Road in Acampo, Ca. I used a light green toned masonite board, oil paint and probably will not do that again. This is approximately 6 " X 6". To buy for $150.00 click here.

Sunday, January 25, 2009

Hay 10, Weathered Red Tractor

Do any of you have a studio full of work that isn't quite right? Well this used to be one of those. I decided I was going to give the remaining hay pieces a fresh look and see what they need to be stronger. This is Hay 10's new look. The tractor was added and a few other changes so the composition would work better. Before it was bland. This is approximately 6" X 6", on a masonite panel, done in oil paint. The edges are painted so if you want to float it you can. This painting comes unframed. To buy for $150.00 click here.

Saturday, January 24, 2009

Hay 9 Freshly Cut Hay

This is more hay. It is the 9th one I painted. The strokes are bold and colorful. The hay is cut but not yet baled. This is almost 6" X 6" done in oils. The canvas had a red underpainting. To purchase this painting for $150.00 unframed click here.

Friday, January 23, 2009

"Hay 2" Oil 6"X 6"

This is the 2nd of 50 Hay pieces that I did. It really makes you think when you are doing 50 in a single theme. This piece is on masonite and is almost 6" X 6". To purchase this painting for $150.00 click here.

Thursday, January 22, 2009

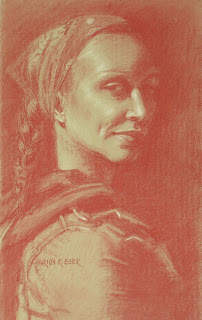
"Me" M14

This was the final for the head drawing class. It is a pastel portrait and it was very painful to draw. I was at war with the pastel through out the drawing and often wanted to tear it up. There are things I like about it. The left cheek, the reflected light under the chin...but I hate the neck...I am getting older and this piece made it only to clear. I found out last night that I will be in the 50/50 show again this year. For those Daily Painters...you already do this everyday, but for me it is a 6"X 6" painting everyday on top of my masters class and teaching high school full time. I maybe crazy.

Wednesday, January 21, 2009

"Gypsy" M14

Sorry, I am a bit confused. This portrait is actually the one on the cardboard, the kind on the back of tablets of paper. It is oil thinned with turp and then used in a dry brush technique. The last one was a pastel.

Tuesday, January 20, 2009

"Moo" M13

This one was a lot of fun, very difficult and not very successful. It was morphing a cow and I.
I could see if someone could do this very well they could create some very interesting characters.The drawing is conte on grey paper.

Monday, January 19, 2009

"Genivian Princess" M10

This was a lot of fun. She is oil painting to look like pastel. The oil paint is thinned way down with turps and used in a dry brush technique. This is one weeks work. Oups, this is a pastel. Must be my age!?

Sunday, January 18, 2009

"With Dreads" M11 Pastel


This pastel was done on printmaking paper and a full value charcoal drawing was done first, sprayed with a fixative then pastel was done over the top. I really like pastels but I had never tried this approach before.

Saturday, January 17, 2009

"Tre" M8 and M9


This was one of my high school students. He has such character in his face. In module 8 I shot the photos for these drawings and in module 9 I drew both portraits. I really like these drawings. I thought you might like to see the image I worked from so I just attached those pictures. He has such a great face!!

Friday, January 16, 2009

"Head DrawingMidterm" M7


The tiny heads are all the size of a quarter approximately. This is kind of strange but also fun. They are about value not line. Most are family except the very bottom one was an Academy model. The midterm was a nightmare. All those curls....these were still using grey paper and conte. This drawing approach is not about line. This was a one week assignment. Approximately 13" X 18".

Thursday, January 15, 2009

M6 Male and female head drawing


These heads have more expression than the past ones. Again this is one weeks work. They are both conte on grey paper and about 13" X 18"

Wednesday, January 14, 2009

"Head with Focus on the Ear" M5


This module focuses on the ear. All ears have things in common but they are also very specifically different, which makes them look like a certain persons ears. This was one weeks work. I did a drawing of the ear first then a head of both a male and female with emphasis on the ear. All were done on gray paper with conte.

Tuesday, January 13, 2009

3 head drawings M4


These drawings are one weeks work for module 4. I had to do a practice nose mouth combination, then a male and female head. These drawings are done in conte on gray paper. Sometimes it is tricky to get the turning, lost edge as it disappears into the dark shadow. The form shadow describes the curve of the form. The cast shadow has crisp edges where the form shadow has soft edges.

Monday, January 12, 2009

"Male Head" M3

This is the drawing of a male head that I did as an assignment for Module 3 (a module is like a unit or one weeks work) In this module I had to do a female and male conte drawing on gray paper. It is about 13" X 18". I had to be careful with the white as it is easy to put to much on and that flattens the head. Also if I blend to much it is to smooth which is also not good. I learned a lot about cast shadows and form shadows. Before this class all shadows were the same. Not any more!

Sunday, January 11, 2009

"The Real M3 Female"

I looked at my files wrong yesterday. This is one of the drawings from module 3. Tomorrow I will post the other drawing from M3. In M3 I had to do a drawing of a female head and a male head. All the heads must have dramatic lighting to be effective. 3/4 view of the head is always better than a frontal view in portraits. Also lost and found edges are also important. This drawing is 13" X 18" conte drawing on gray paper.

Saturday, January 10, 2009

Female Head Drawing M10

This is the 3rd drawing in my head drawing class at the Academy of Art on-line class. I was trying to use a feathery technique at the edges of the hair to give a soft look. This is conte on gray paper and about 13" X 18". Oups, I got confused...this is actually my module 10 drawing. I do not know how to remove an incorrect image yet, so tomorrow will have the real M3 drawing.

Friday, January 9, 2009

"What Did You Say?"

The next 13 or so drawings I am posting are from my head drawing class at the Academy of Art in San Francisco. I have a link to the Academy if you want to look at it. This drawing is done with conte on gray paper. It is about a 13" X 18" or so. I did not post the first drawing for this class. It was to draw a sphere in full value. Most work in this head drawing class is done on the gray paper with conte.

Thursday, January 8, 2009

"Buena Vista" Sold

This is my final for the landscape class. This is the Buena Vista in San Francisco. It was also a commission piece, so I went to S.F. several times to take reference photos and get more information for the painting. It is a 24" X 36" oil painting. If anyone wants to see the steps to painting this e-mail me and I will post them.

Wednesday, January 7, 2009

"Intense Napa Autumn" Three Steps


This was the 2nd large project. It is a 24" X 30" oil landscape painting. I have shown 3 steps of development. This is not always how I start an oil painting but it can help establish the value pattern and also helps to realize where the different values are before diving into color. To Purchase the finished painting for $1,300.00 click here.

Tuesday, January 6, 2009

Napa Vineyard Dressed in Yellow

This is still part of my landscape class from the Academy of Art. It is an analogous color scheme which was soooooo much fun. I want to play with those wonderful color theory ideas when I have a bit more time! It is an 11" X 14" oil painting on stretched canvas. Click here to buy for $500.00 unframed.

Monday, January 5, 2009

"Red Hot Napa"

This was a study for a larger piece. It is a red analogous color theme, which is a lot of fun to do. The color is very playful. I just love the 2 story house with the single tree in front of it. All the lines are guiding you to that simple house. This is an 11" X 14" oil painting to buy for $500.00 click here. Another way to help with values is to get a piece of red flat plastic and look at your painting through it. It will help you see if the values are working or to close together. Well, school starts again today. Have a great day.

Sunday, January 4, 2009

"Pismo Beach Emerging"

This was the 2nd big project for my landscape class at the Academy of Art University. This took about 3 weeks, while also working on other small pieces. I painted this in 3 stages like I did the Napa piece. If anyone wants to see the other stages post a comment and I will post them as well. Yesterday's post was the small rough draft for this piece. If you look closely the color, atmosphere, and composition are slightly different from the smaller version. I tryed to give the sky many gentle transitions of color to create the illusion that the sun really wants to come out but is yet unsuccessful. This piece is in oil, 24" X 30" and is 1,300.00 unframed.

Saturday, January 3, 2009

"Foggy California Coast"

This one is actually a study for a much larger one. I had to do a bit of editing to make the composition work. I can not remember the name of this beach, I am so forgetful sometimes. This is a 11" X 14" oil on stretched canvas. Click here to buy this painting for $500.00 unframed.

Friday, January 2, 2009

"Acampo Road Palm"

This was the perfect day. My friend Nancy and I were out on location painting on Acampo Road about 5 miles from my home. This is a 11" X 14" oil on canvas and is $500.00 unframed. Today is my birthday so my husband Jerry is making me a special dinner.

Thursday, January 1, 2009

"Napa Autumn" 3 steps


These are the 3 major steps I used to paint this piece. I do not use this method all the time, but if you struggle with value it can be helpful. I blocked in the values with Burnt Umber, burnt siena and white using liquin to keep it fairly transparent. Once this underpainting drys then I blocked in color over the top. This is a 24" X 30" oil painting. To buy click here it is $1,300.00 unframed.